Collection Attributes
The Collection Attributes window enables you to set attributes of file and folder collections from several locations in your computer.
If you are in Scan Mode,
select the folder where the items reside, press the Scan button and when
the scanning is done, check the items you want to update, right click the mouse
button and choose Properties.
If you are in List Mode, add the items to the list, press the
right click button and choose Properties.
The attributes window will pop- up. When all details are loaded, the
following screen will show up as shown in figure 4.1:
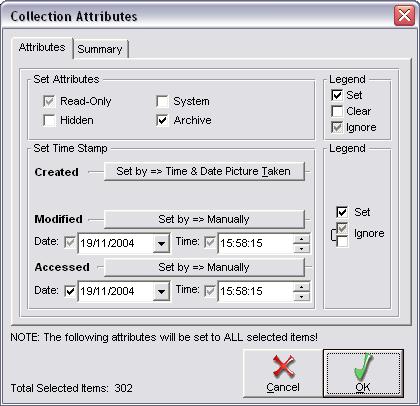
Figure 4.1
Now you can navigate through the two tabs: Attributes and Document
The Attributes Tab
In this tab, you can do the following:
Set attributes of files and folders:
In the
Set Attributes frame you can set, clear or leave unchanged attributes of
the items. You can change the Read-Only,
Hidden, System
and Archive attributes for files and
folders.
When loaded, the available checkboxes for each attribute are:
-
 (Unchecked) - The selected attribute is currently cleared for all items.
 -
 (Checked) - The
selected attribute is currently set for all items.
(Checked) - The
selected attribute is currently set for all items. -
 (Grayed) - The selected
attribute is not equal for all items.
(Grayed) - The selected
attribute is not equal for all items.
Now, you can change the attributes for all items by marking the relevant checkbox as follows:
-
(Unchecked) - Clear this attribute for all items.
-
(Checked) - Set
this attribute for all items.
-
(Grayed) - Leave this
attribute unchanged for all items.
Set the time stamp of files and folders:
In the Set Time Stamp frame
you can set one time stamp for a group of files or folders. You can set the
date, time
or both date and time values.
When loaded, there are two available checkboxes modes for both the date and time
fields:
-
(Grayed) -
At least one value is different. The current system time stamp is shown.
-
(Checked) -
All values are equivalent. The shown time stamp is as retrieved from the files
or the folders.
Now, you can set one time stamp for all items by marking the relevant checkbox as follows:
-
(Unchecked) or
(Grayed) -
Leave this value unchanged.
-
(Checked) - Set
this value for all items.
Note that you must check any field before you can change it. Unchecked or grayed fields are locked.
NIYoW also enables you to automatically set the date and time fields of files using one of eight different sources. To enable automatic date and time generation, press the "Set By" button next to appropriate date field you would like be changed. A windows with the available sources will be opened. Now you can choose one of 9 source types:
-
File, Time & Date Created - The time the file was created.
-
File, Time & Date Modified - The time the file was last modified.
-
File, Time & Date Accessed - The time the file was last accessed.
-
JPEG, Time & Date Picture Taken - The original time the image was taken. Applies only to JPEG files.
-
JPEG, Time & Date Last Modified - The time the image was last modified. Applies only to JPEG files.
-
Document, Time & Date Created - The time the document was created. Applies only to MS Office documents and files reside on NTFS volumes.
-
Document, Time & Date Last Printed - The time the document was last printed. Applies only to MS Office documents and files reside on NTFS volumes.
-
Document, Time & Date Last Saved - The time the document was last saved. Applies only to MS Office documents and files reside on NTFS volumes.
-
Manually - Set the time & date manually.
Note that files that are not supported by the source type will be ignored automatically.
Select the mode you need and press OK to apply or Cancel to leave
the current mode unchanged.
The Document Tab
The Document tab enables you to set the details of multiple documents at once. Documents are defined as Microsoft Office documents and files that reside on NTFS volumes. Whenever you select files that doesn't have the summary information available, a warning note will be shown to indicate the those specific files will be ignored during the save process.
Each field in the Document tab has a check-box next to it with one the 3 following modes:
-
(Unchecked) or
(Grayed) -
Leave this field unchanged.
-
(Checked) - Set
this field for all items.
Make the changes you need and press the OK button to update the selected files.
The "Update Results" Window
When the update process is done, a new window will open with the updating results. In this window you can review each file individually and view the results of each part of the update process.
Each update is divided into 5 sub-update processes:
-
AT = Attributes - The attributes of the file/folder.
-
CR = Created Date - The creation date of a file/folder.
-
MD = Modified Date - The last modification date of a file/folder.
-
AC = Accessed Date - The last access date of a file/folder.
-
DC = Document - The summary information of a document. Available only for MS office documents and files that reside on NTFS volumes.
Each sub-update process result is marked as follows:
-
O = Updated successfully
-
X = Failed to update
Example of the Update Results window is
shown below:

Figure 4.1
.When done, press the OK button to close this window
Copyright ⌐
2004 MC Software
All rights reserved